1. Installing the Theme
From the Shopify Theme Store
Using this method ensures your theme is fully linked to your Shopify account, making it eligible for automated updates and security patches.
-
Log in to your Shopify Admin.
-
Go to Online Store > Themes.
-
The theme will appear in your Theme library.
-
Click Edit theme to start setting up your store.
-
When you are ready, click Publish.

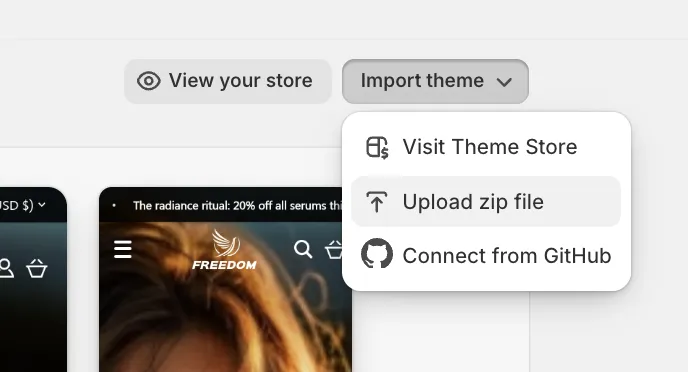
Uploading a ZIP File (Manual)
You may use this method to import a paid theme onto a development store for testing and customization purposes.
-
Go to Online Store > Themes.
-
In the Theme library section, click Add theme > Upload ZIP file.
-
Select the
.zipfile and confirm.
Please note that themes installed via ZIP file will not receive automated updates from Shopify.
2. Updating the Theme
We periodically release updates to our themes to introduce new features, performance improvements, and bug fixes.
How to update
When a new version is available, you will see a notification below the theme version number in your Online Store > Themes dashboard.
-
Click on the notification (e.g., "Version 1.1.0 available").
-
Click Add to theme library.
-
Shopify will create a new version of the theme, e.g. "Updated copy of Freedom".
What gets transferred automatically?
Shopify's update engine will attempt to copy your content and customizations to the new version automatically. This includes:
-
Theme Settings: Colors, typography, and global settings.
-
Sections & Blocks: Your homepage layout, product templates, and page structures.
-
Content: Text, images, and videos configured in the editor.
-
App Embeds: Settings for supported apps.
Handling Custom Code
If you or a developer have modified the theme's source code (HTML/Liquid/CSS) directly:
-
No Conflicts: If your code changes do not conflict with the update, Shopify will copy them to the new version. You will see a message: "Theme added: code edits successfully included."
-
Conflicts Found: If your code changes conflict with the new files, the update will still proceed, but your custom code will not be copied. You will see a message: "Theme added: code edits could not be included."
Important: If your code edits were not included, you must manually copy them from your old theme to the new "Updated copy". We recommend using a code diff tool or an app to identify these changes.
3. Automated Updates
For minor updates that fix bugs or security issues (without changing the design or settings), Shopify may apply the update automatically. You will receive a notification in your admin when this happens. These updates do not affect your store's look and feel.
4. Best Practices & Safety
-
Always Review Before Publishing: The update creates a draft theme ("Updated copy..."). Your live store is not affected until you click Publish. Always preview the new theme to ensure everything looks correct.
-
Backup Your Data: While the update process is safe, it is good practice to duplicate your current theme before performing major updates.
-
Custom Code Warning: Please note that issues arising from custom code modifications (edits to Liquid, CSS, or JS files) are not covered by our standard support policy. If an update overwrites your custom code, you may need to hire a Shopify Expert to restore it.